LED Blink & PWM
Project 01 - Learning the fundamentals of Arduino through LED blink, sequencing, and PWM brightness control
Days took - 01
Project 01
I’ve done this project a million times before, but never actually documented it anywhere. As I mentioned at the start, this website is my space to track and record detailed documentation of every project I build. If you haven’t read my previous blog, check it out!
Introduction
The first thing everyone does after getting an Arduino is making that built-in LED blink and that’s where the magic begins. So what next? Let’s connect a few wires and make the software talk to the hardware.
Before we start, you might want to go through my previous blogs on Arduino, Projects, and the Catalogue, which is basically a guide to my projects in sequential order.
So without further ado, let’s get started!
Tier 1 - Getting it to Blink
The main goal of this stage is simple, plug in a single LED to the Arduino and get it to blink. For that, you’ll need the Arduino IDE and a bit of C++ knowledge. I learned through a bunch of YouTube tutorials on how to code, compile, and run sketches, still very much a beginner though.
Gotta remember these shortcuts, gonna help in the long run
- ctrl + s = save
- ctrl + r = run the code
- ctrl + u = upload the code
Components
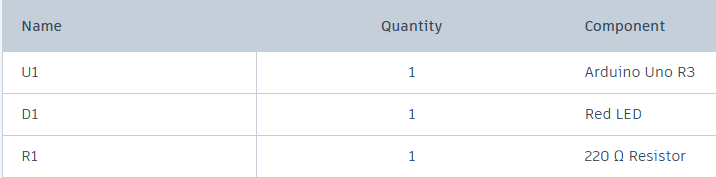
These are the components I used for this tier, nothing fancy, just an LED blinking setup.
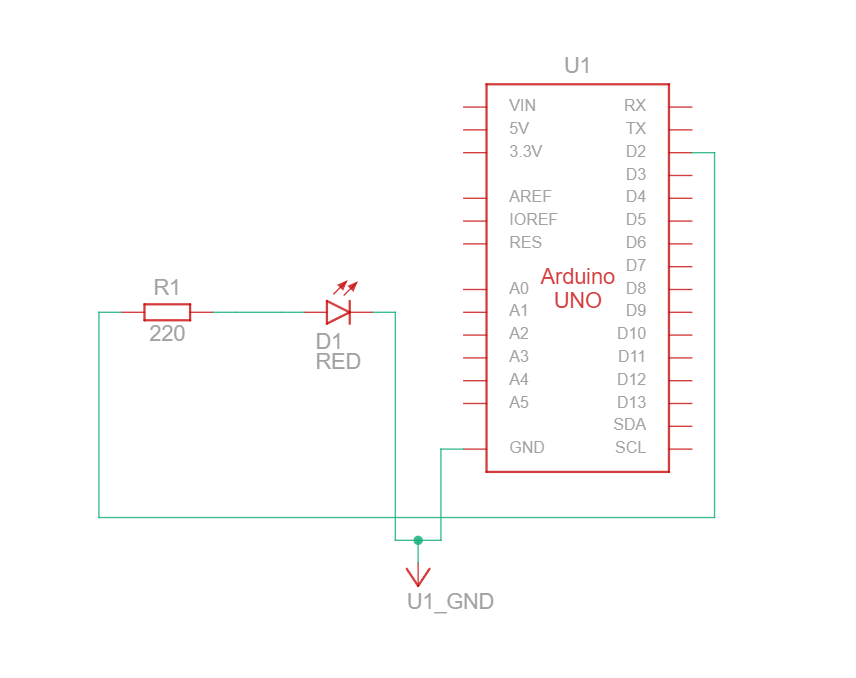
Schematic
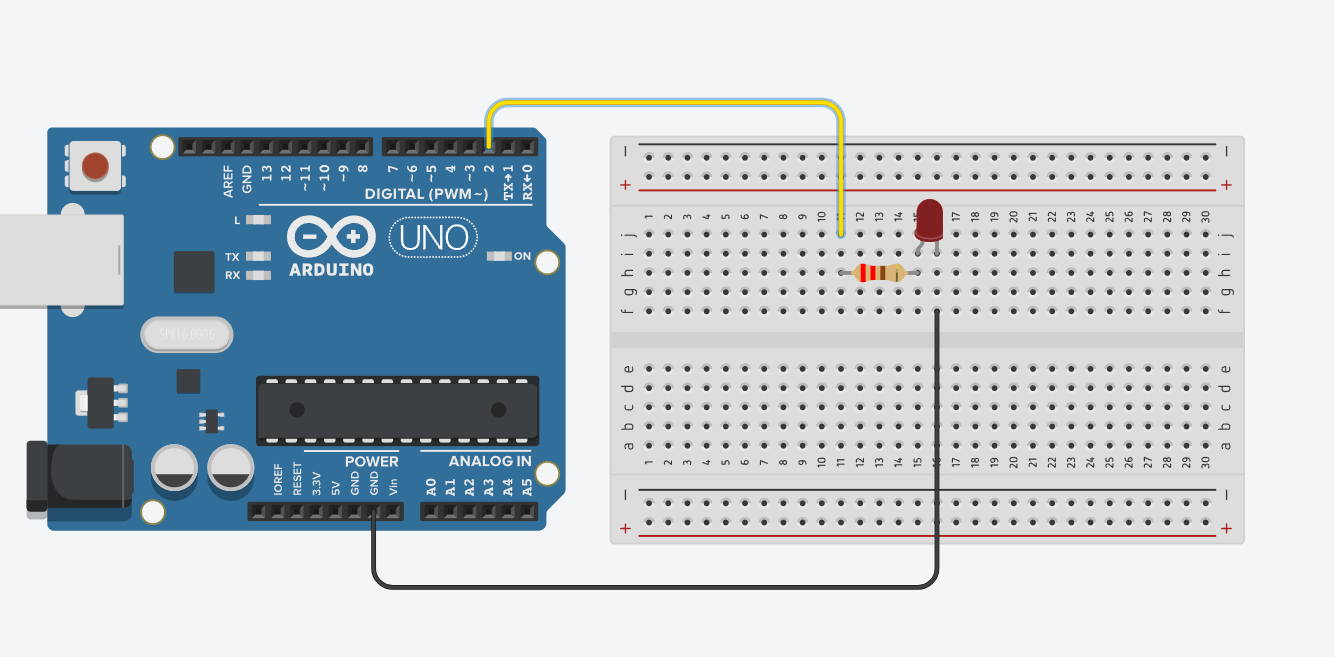
Circuit
Code
This looked quite different from standard C++ to me at first. Many call it Embedded C, but technically, there’s no separate language called that, it’s just C/C++ used for embedded systems.
1
2
3
4
5
6
7
8
9
10
11
12
int ledPin = 2;

void setup() {
  pinMode(ledPin, OUTPUT);
}

void loop() {
  digitalWrite(ledPin, HIGH);
  delay(100); // Wait for 100 milliseconds
  digitalWrite(ledPin, LOW);
  delay(100); // Wait for 100 milliseconds
}
Output
Tier 2
After connecting a single LED and making it work, I wanted to do something more, So now, I’m thinking of using 3 LED’s with delays such that it can turn off while the other is on, and run it on a loop.
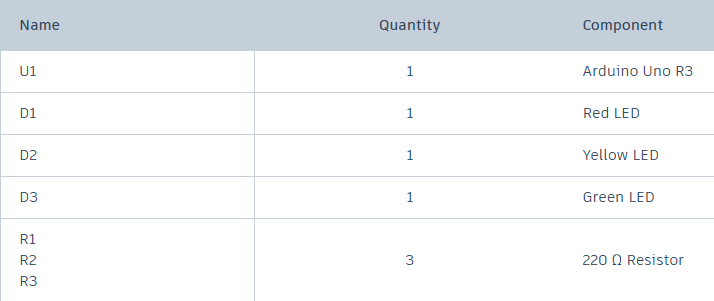
Components
Schematic
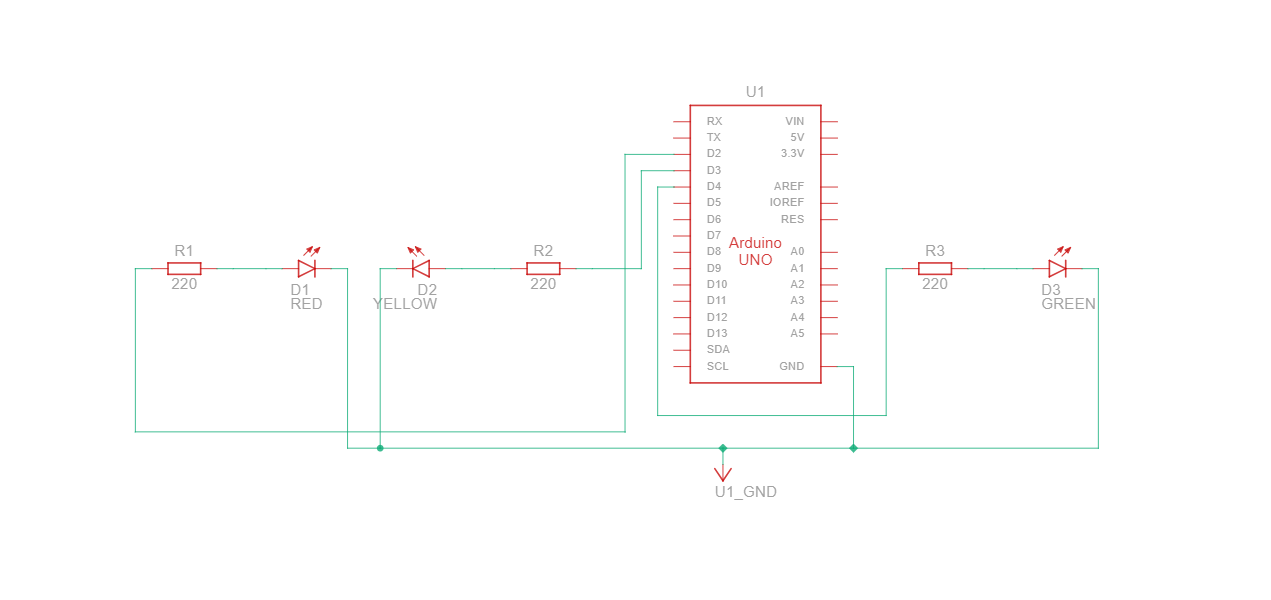
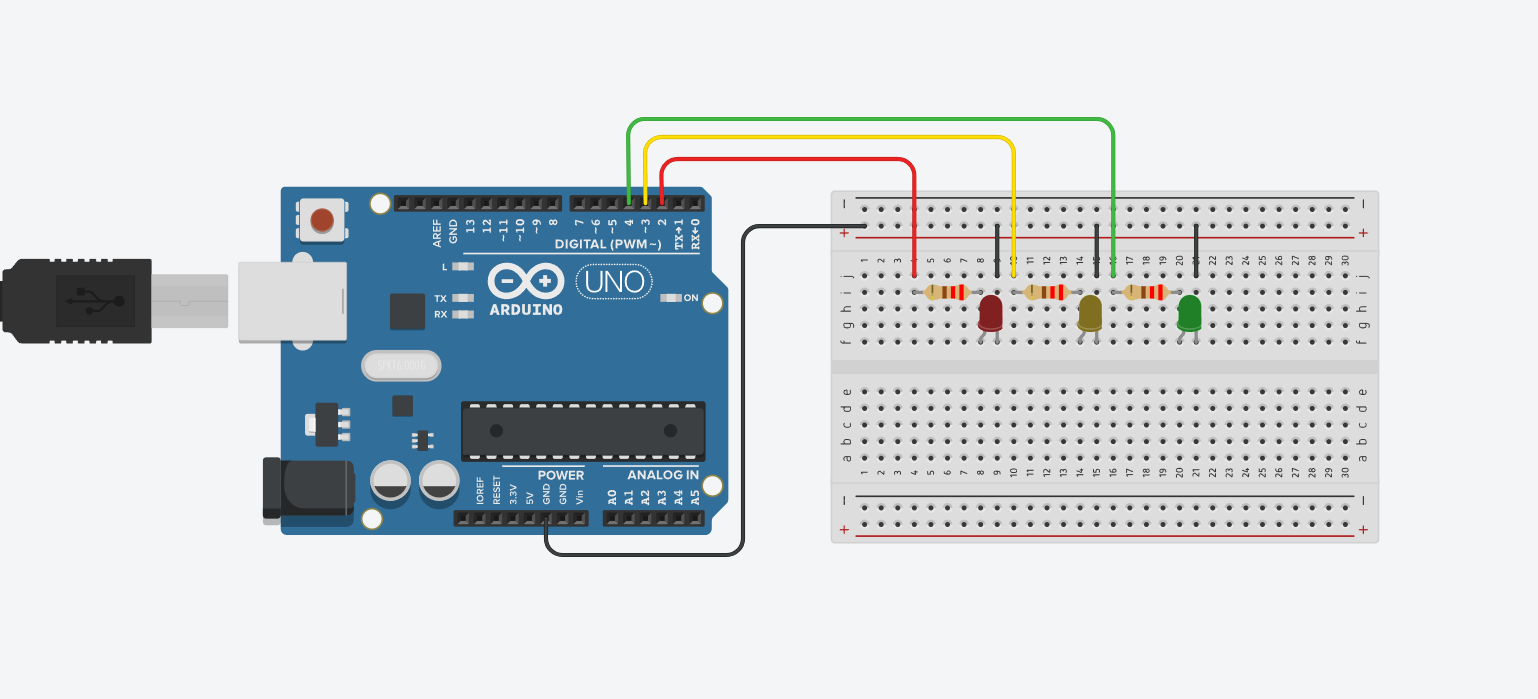
Circuit
Code
1
2
3
4
5
6
7
8
9
10
11
12
13
14
15
16
17
18
19
20
21
22
23
24
25
26
int firstLedPin = 2;
int secondLedPin = 3;
int thirdLedPin = 4;

void setup()
{
  pinMode(firstLedPin, OUTPUT);
  pinMode(secondLedPin, OUTPUT);
  pinMode(thirdLedPin, OUTPUT);
}

void loop()
{
  digitalWrite(firstLedPin, LOW);
  delay(1000);
  digitalWrite(firstLedPin, HIGH);
  delay(1000);
  digitalWrite(secondLedPin, LOW);
  delay(1000);
  digitalWrite(secondLedPin, HIGH);
  delay(1000);
  digitalWrite(thirdLedPin, LOW);
  delay(1000);
  digitalWrite(thirdLedPin, HIGH);
  delay(1000);
}
Output
Tier 3 - PWM
After running the first two LED programs and burning through a few LEDs in the process, I moved on to controlling the intensity or brightness of an LED using PWM, which stands for Pulse Width Modulation.
At this point, a question naturally popped into my head:
“If I can control voltage using resistors or a potentiometer, why do I even need PWM?”
That led me to break the topic into three parts:
- What is PWM?
- How do I use/apply it?
- Why can’t I just use a potentiometer or a bunch of resistors?
With the help of the
Arduino Cookbook by Brian W. Evans, and
Arduino Basics 101 by GreatScott!,
I finally started piecing everything together. So here’s my version of what PWM really is:
What is PWM?
PWM is basically a con artist, a clever trick that makes digital signals look analog.
A microcontroller only understands two states:
- ON → Digital HIGH → 5V
- OFF → Digital LOW → 0V
So how does it create all those brightness levels in between?
By switching the LED ON and OFF extremely fast, so fast that our eyes cannot notice the blinking.
It might be switching:
- 1,000 times per second, or
- 10,000 times per second
Our brain perceives the average brightness, not the individual blinks.
This creates the illusion of smooth dimming or increasing brightness.
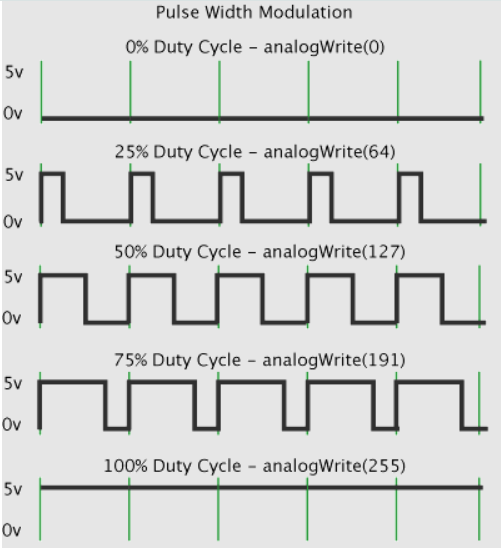 Pulse Width Modulation
After getting some insights about it, lets start the project now.
Components
Compoents List
Schematic
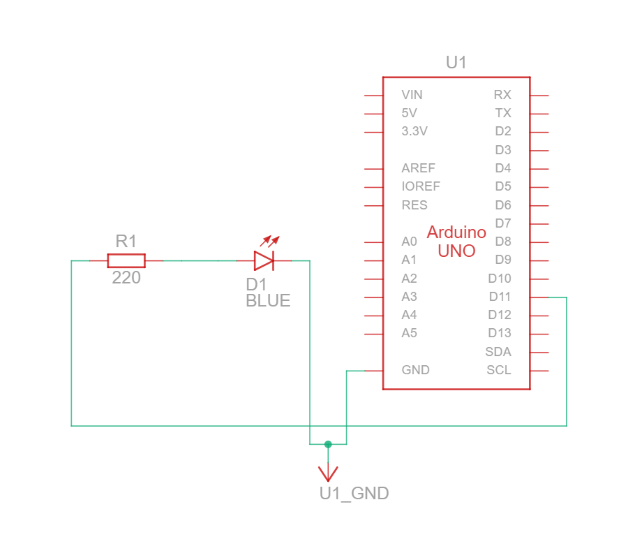 Schematic view
Circuit
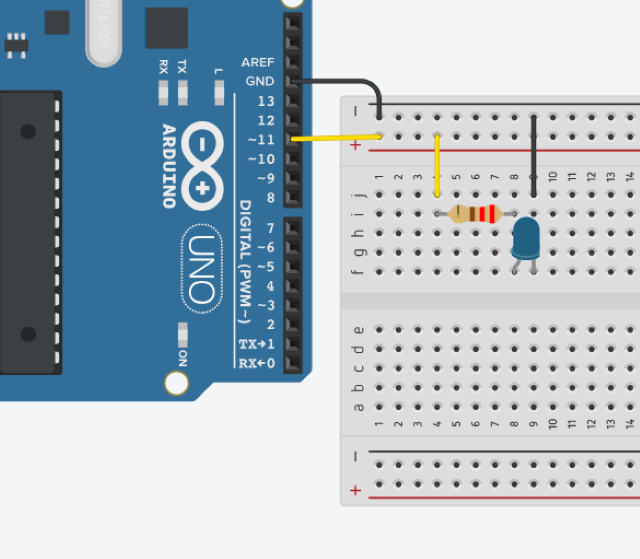 Circuit model
Code
There are some few new things in the code
1
2
3
4
5
6
7
8
9
10
11
12
13
14
15
16
17
18
19
20
21
const int led = 11;
int brightness = 0;
int increment;

void setup()
{
  //Not required because of analog funtion;
}

void loop()
{
  if(brightness > 255){
    increment = -1;}
  else if(brightness < 1){
    increment = 1;}
  brightness = brightness + increment;

  analogWrite(led, brightness);

  delay(10);
}
So the few-new things are
- the value 255
- analogWrite() *function
One more important thing to note down, Arduino uses 8 bit PWM, which means 2^8 = 256 possible values ranging from 0 to 255
The analogWrite() is used to trick the digital output of the micro-controller giving us the dim and uncrease of brightness.
I could have used a potentiometer, which is a variable resistor that physically changes the voltage across the LED. But potentiometers come with a few drawbacks:
Potentiometer (Analog Control) — Cons
- Wastes power as heat
- Not precise for digital or automated systems
- Only works when you manually rotate it
- Doesn’t integrate well with microcontroller-based control
On the other hand, PWM gives:
- No power loss as heat (very efficient)
- Accurate, programmable brightness control
- Works perfectly with microcontrollers
- Can be automated, animated, looped, or mapped to sensors
The only con of PWM is simple:
It doesn’t work without a microcontroller.
But for digital electronics and embedded systems, PWM is the right tool.
Output
Conclusion
Here’s everything I learned from this project:
- GPIOs – basic digital input & output
- PWM – controlling brightness through duty cycle
- Digital vs Analog Output – how microcontrollers fake “analog”
I definitely need more practice to sharpen these skills, and this project was a solid start. Apart from this, I really need to focus on C and C++ programming languages, because its faster than python, but inevitably I need to learn python because of Raspberry Pi, waiting on my desk. So yeah, that’s it, if you wanna check out my other blogs, and want to know more about
These are the links, check it out.
Thank you for staying with me till the end, I’ll see you guys in the next project.
Till then, bye-bye!