ESP32
My journey on how I started using ESP32
ESP32 - An Upgrade?
I have already got an Arduino and some-what have a grasp on how things work with it, so the first sane thing to do after getting an ESP32 development kit is to plug it to my computer and dump a code then see it work, right? Nope, that’s not what we are going to do, ok so before getting started in this new venture I would like to thank Espressif and Jocelyn Zhang who sponsored me 3 ESP32 development kits. In Particular, two types of them and those boards are:
- ESP32-S3 DevKitC-1
- ESP32-C3 DevKitM-1
After getting my hands on these guys, a few questions and doubts started appearing, I mean a lot of doubts and definitely a lot of questions. I’m going to phrase some of them here:
- What makes an ESP32 different from an Arduino?
- Are there any other microcontrollers except Arduino and ESP32?
- Aren’t the three boards same?
- What is with their naming convention?
- When and Why do I need to use an ESP32?
It kept going on and on and on, the questions never stopped. As an engineer, I started tackling them one by one, and it took me a lot of time to get answers, but here I am. Skip to the beginning if you are already well acquainted with all these.
ESP32 v/s ATMega328
Arduino is not a microcontroller, while ATMega328 is, so it’s basically ATMega328 v/s ESP32, So before even touching the ESP32, I had to get an answer for the most basic question:
“Why should I use an ESP32, when I already have an Arduino (I mean ATMega328)?”
It turns out that, it wasn’t just an upgrade, but this was on a whole new level, talk about over-kill, running web servers, trying to control another ESP32, RTOS, what the hell am I witnessing?! Thanks to Robonyx and his video about Arduino to ESP32: How to Get Started on YouTube, and some other resources I got to look at on the internet from Random nerd tutorials and Espressif. Okay, okay I’ll stop citing sites I’ve used (for now) and get to the point, tabular columns do work, but let me take a different approach.
- ESP32 is faster, more modern and can handle complex tasks without breaking a sweat (from an 8-bit to 32-bit processor, UFF).
- ESP32 is made for IoT (Internet of Things) & Arduino is not (Not without external modules).
- ESP32 can run big programs, APIs, web servers, with more RAM & more FLASH.
- ESP32 has Analog output, Better DAC, PWM on every pin (almost), timers, Hardware encryption, the tools for a proper embedded system projects.
- ESP32 is Industry standard for low power electronics, which is 3.3v
- Not so easy learning curve (for me)
I’m comparing the ESP32 to Arduino UNO R3, the Arduino board I have, the only Arduino board I have
So here’s a table, plotting the difference between ESP32 and Arduino UNO R3 (I mean ATMega328).
| Feature / Spec | Arduino UNO R3 | ESP32-C3 | ESP32-S3 |
|---|---|---|---|
| MCU / Core | 8-bit AVR (ATmega328P), single core, 16 MHz | 32-bit RISC-V, single-core, up to 160 MHz | 32-bit Xtensa LX7, dual-core, up to 240 MHz |
| Flash / Code Memory | 32 KB (≈ 0.5 KB used by bootloader) | 4 MB external flash | 8 MB flash (typical) |
| RAM (SRAM / Vars) | 2 KB | ~400 KB internal SRAM | ~512 KB SRAM (+ optional PSRAM) |
| Wireless Connectivity | None | Wi-Fi + Bluetooth 5 LE | Wi-Fi + Bluetooth 5 LE |
| GPIO / Peripherals | 14 digital, 6 PWM, 6 analog, SPI/I2C/UART | ~22 GPIO + rich digital interfaces | ~45 GPIO + advanced peripherals |
| Operating Voltage | 5 V | 3.3 V | 3.3 V |
| Processing Power / Use-Case | Simple sensors, LEDs, motors, basic logic | Mid-level IoT, BLE devices, low-power sensors | High-performance IoT, ML, camera/audio, complex edge compute |
| Development Environment | Arduino IDE (super easy) | Arduino IDE + ESP-IDF (native) | Arduino IDE + ESP-IDF (full power) |
| Power Consumption | Moderate (no deep sleep optimizations) | Efficient for battery IoT | Efficient with high-performance modes |
Any Other Micro-controllers?
After a series of searching and asking my friends (*ahem ChatGPT), I got to know that there are a few other microcontrollers which are same but are beefed up in other parts of working/Utilities, let me name some of them.
STM32
STM32 is a family of 32-bit ARM Cortex microcontrollers made by STMicroelectronics. They are far more powerful than Arduino UNO and often used in industry-grade embedded systems.
 STM32 Micro-controller
PIC (Peripheral Interface Controller)
PIC is made by Microchip technology, these are 8-bit, 16-bit and 32-bit microcontrollers used in:
- Appliances
- Automotive control
- Industrial applications
- Power electronics
- Old-school embedded systems
This was the Arduino of 1990s, before ARM came into the picture.
 Various older (EPROM) PIC microcontrollers
That’s everything I found, after digging into the topic, so let’s move forward.
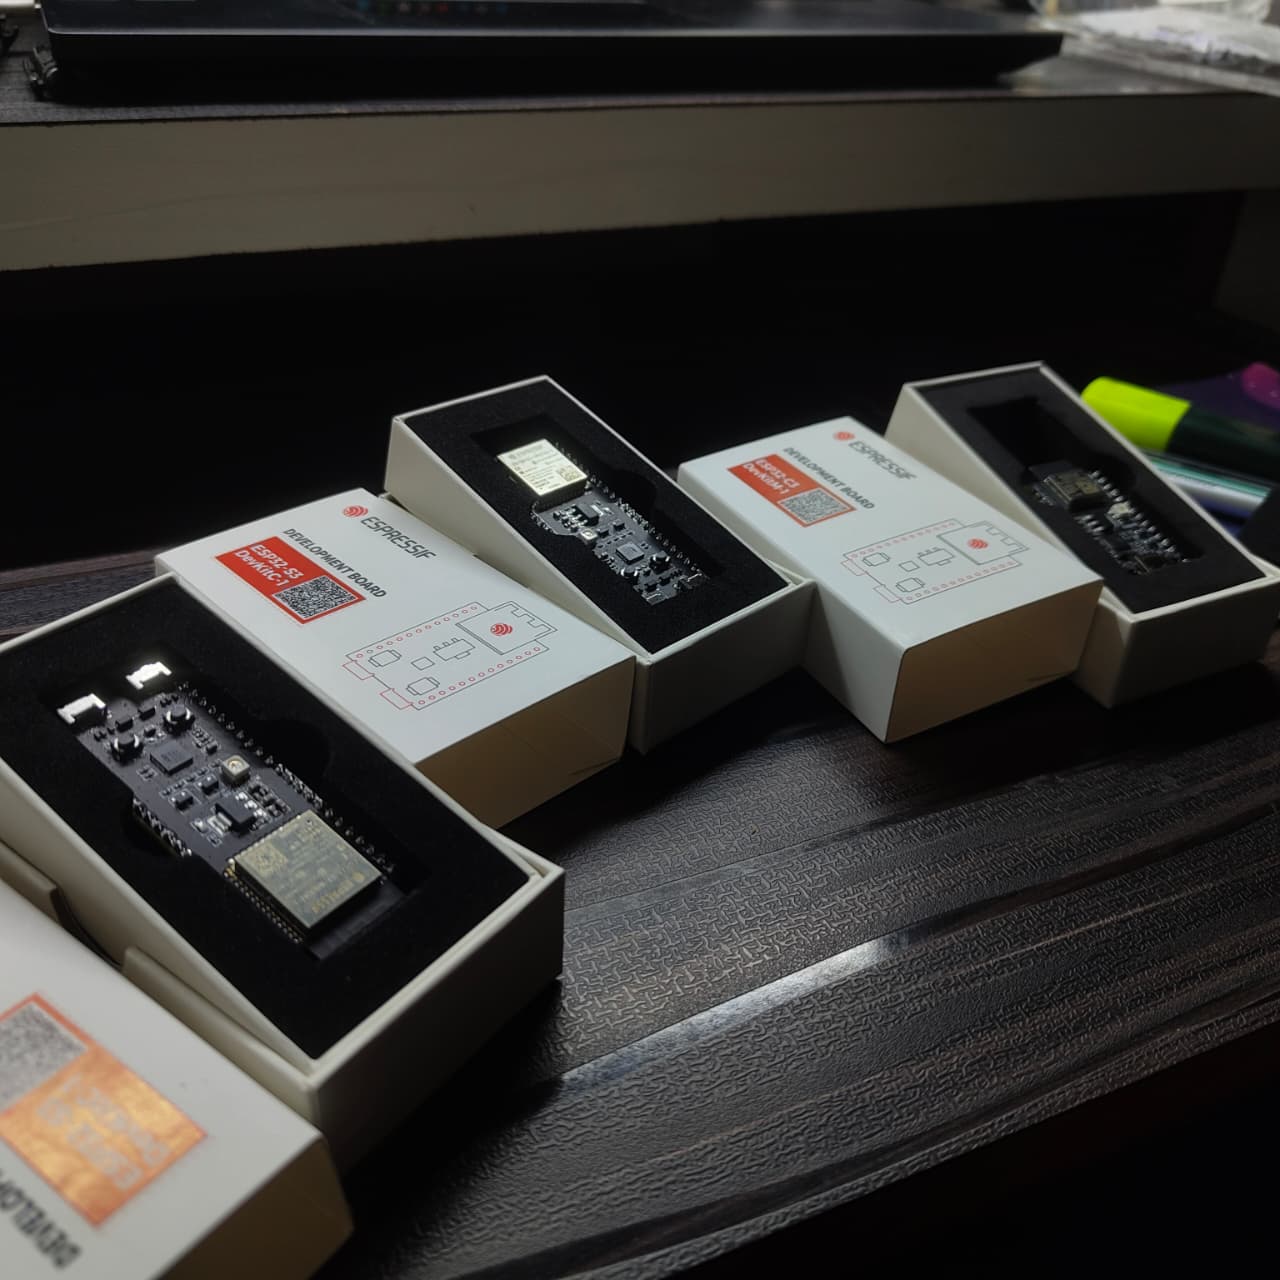
What I Got?!
They sent me three brand new ESP32 boards, which came in rectangular tight, fancy looking premium packaged boxes, which were of 2 different types:
- ESP32-S3 DevKitC-1
- ESP32-C3 DevKitM-1
And What’s so different about these boards?
ESP32-S3 DevKitC-1
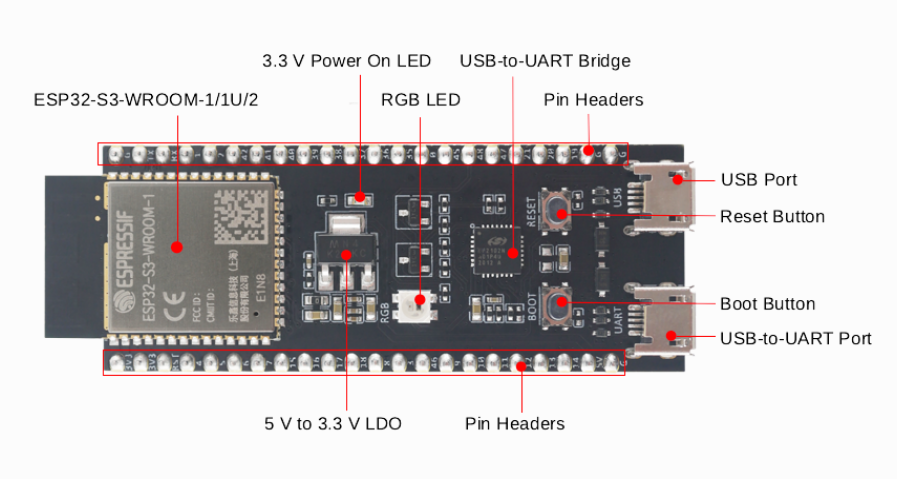 Front view of ESP32-S3 DevKitC-1
I mean, The ESP32-S3 DevKitC-1 is a powerful development board built around the ESP32-S3 SoC, which has a dual-core Xtensa LX7 processor with Wi-Fi + Bluetooth 5 LE, AI Instructions and tons of GPIOs. Turns out this little guy is the best ESP variant out there for:
- Robotics
- IoT (Not any IoT, High performance IoT)
- Edge ML (Well I can definitely use the Tiny ML book I’ve got my hands on)
- Use camera modules
- Audio DSP
- Automation
Impressive isn’t it, I was blown away too, when I took a look at the pin layout.
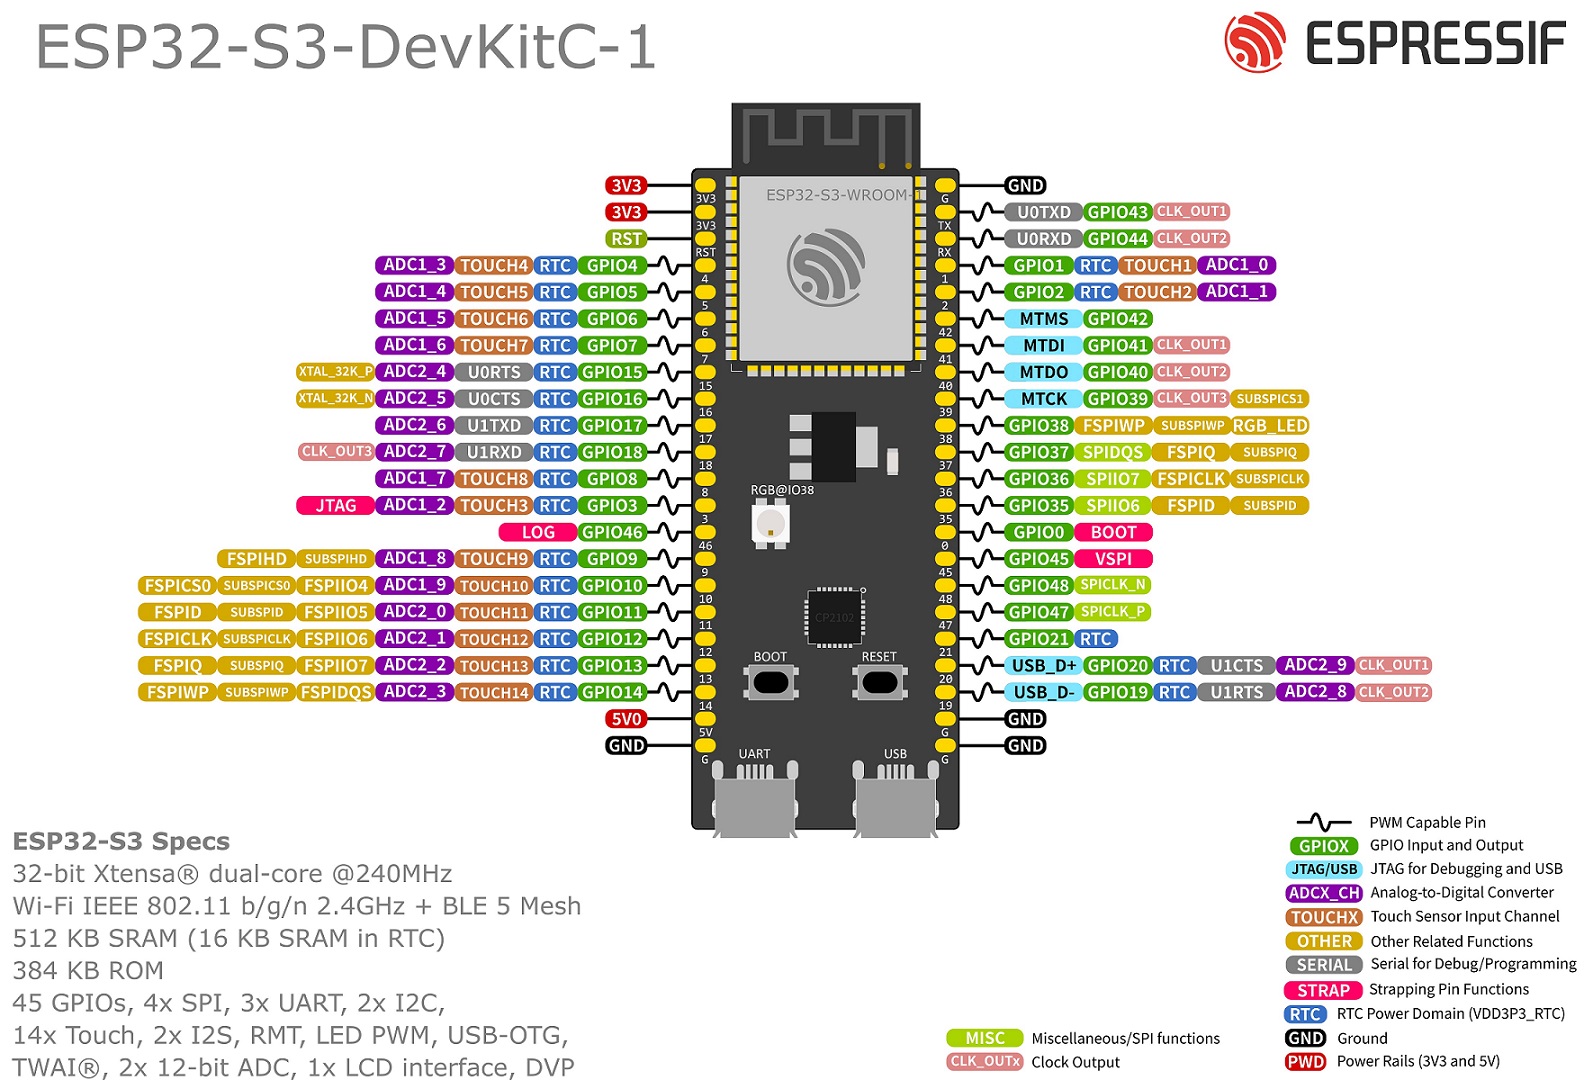 ESP32-S3 DevKitC-1 Pin layout
So many things, that I can’t even comprehend, for now.
Check out their official documentation by Espressif.
ESP32-C3 DevKitM-1
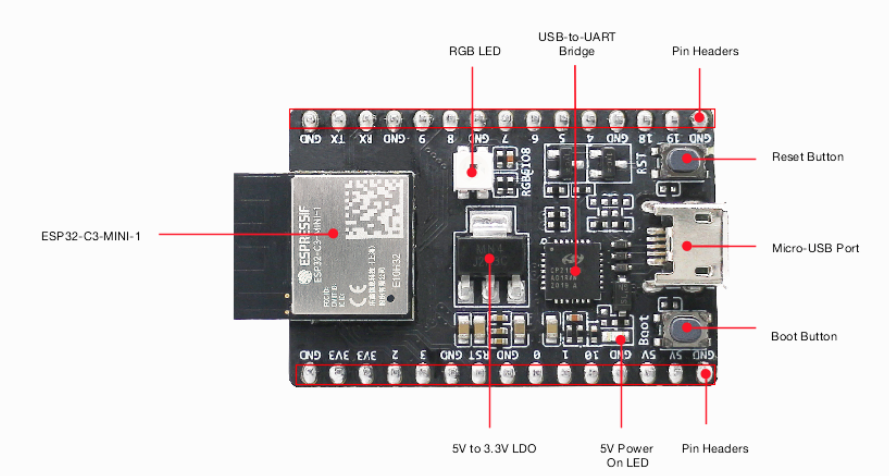
Not a big guy, but a compact, efficient performer. The ESP32-C3 DevKitM-1 is a development board powered by the ESP32-C3 SoC - a single-core RISC-V processor with Wi-Fi + Bluetooth 5 LE, strong security features, and extremely low power consumption. It’s like the little brother of S3, the scale and capabilities of this is a bit smaller compared to S3.
Here’s a pin diagram for reference
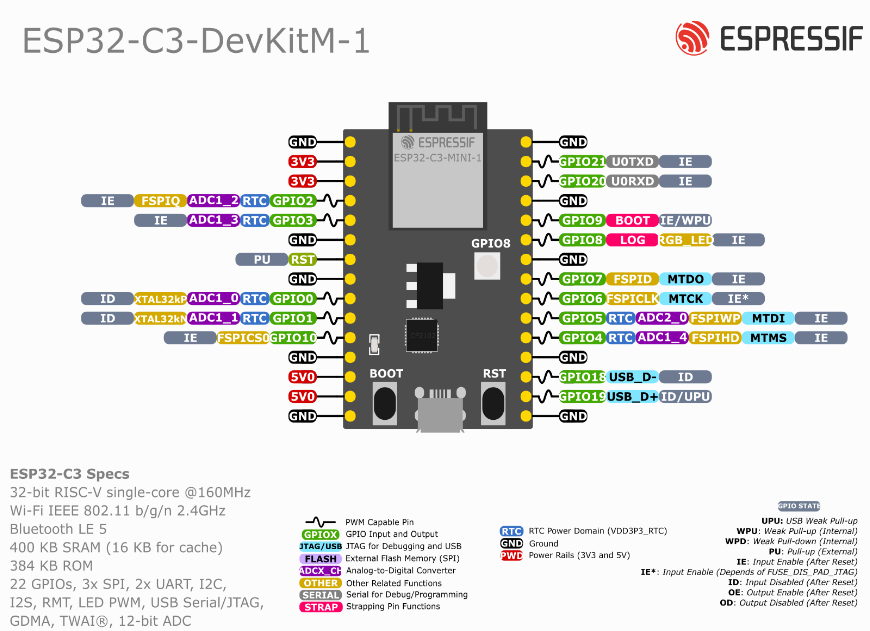 Pin layout of ESP32-C3 DevKitM-1
Check out their official documentation by Espressif.
The Beginning
The thing is, as I mentioned in the beginning of this blog (see: ESP32 - An Upgrade?↗), the first thing to do after getting an ESP32 board isn’t plugging it into the laptop, dump an example code and see the RGB LED blink. No. The first thing is to under-go a painful experience that will consume your entire evening figuring stuff out and at the end of it, to only realize that you were stuck in a loop all along (Source: Trust me).
So to not make the same mistake I did, just go through APK’s IoT Tech’s YouTube video on Getting Started with ESP32 & VS Code: ESP-IDF Setup & First Project!, which I stumbled upon after going through a lot of other videos, showing you how to use platform IDE in VS Code, I’m not against Platform IDE, it’s a great tool from what I heard, but, I always prefer official supported native tools, It’s just a, me thing. Well I’m not going to explain about what ESP-IDF is, it’s a whole new content worth a new blog, so let’s move on.
The Process/Progress
After writing the code, which is in C language, there are a few important things to do, to make the code run and to get it uploaded to the ESP32 Development board.
Ctrl/CMD + Shift + P, A shortcut to open command palette in VS Code
The first thing to do is build the project:
Search for, ESP-IDF: Build Your Project
At first, it’s going to take a lot of time to build the project, and later takes less time.
Then connect the ESP32 to your device, select the respective port before dumping the code into the ESP32, then select your device (You’ll have an Idea, If you watch the video, he explained it really great)
Now it’s time to flash the board or dump the code
ESP-IDF: Flash (UART) Your Project
And Voilà! It is working! Check the output in monitor device section, then we’re good to go.
Conclusion
I am really grateful to those kind souls who sponsored me ESP32 boards, and this introduced me to a glimpse of whole new level of Embedded applications. Ok then, I will see you guys in the next blog, till then make sure your ESP32 isn’t short-circuited!